
Computers don’t understand pictures the way we do. What you see as Mona Lisa is just an array of numbers for a computer. And those numbers need to be structured in a format that those machines can understand. Image transformation in digital image processing precisely does that.
At Xavor, we work with enterprise clients who rely on us for scalable, efficient digital solutions to meet the growing demands of today’s data-heavy world. They want optimized images across a variety of channels in real-time to boost customer experience and improve their product performance. And that goes for our clients in e-commerce, media, or large-scale content platforms; they all require a robust, flexible, and high-performance image management solution.
When you’re serving millions of product images across multiple channels, every millisecond counts. Our existing Aprimo CDN was becoming a bottleneck: basic caching, no dynamic transformations, and pre-generating every image variant wasn’t sustainable.
It became clear that we needed something faster, flexible, and cost-effective; a solution that would keep up with the increasing demands of the enterprise market and provide a seamless experience for our clients.
So, we locked our brains to come up with a smarter solution. And we designed a much better and faster solution using a bit of AWS ingenuity. This post details the image transformation pipeline we built using AWS ECS Fargate, CloudFront, and Sharp.
The Problem
Our legacy setup had clear pain points: no dynamic transformation capabilities, poor performance at scale, and expensive third-party solutions like Cloudinary weren’t viable at our volume.
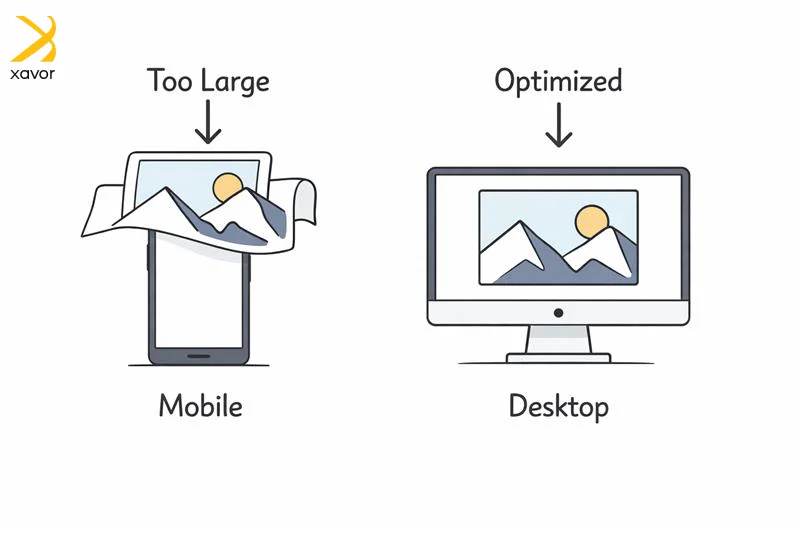
That was a big problem because Modern e-commerce requires serving images in multiple formats (WebP, AVIF, JPEG), various quality levels, and countless dimensions on demand. For example, on a phone, a hero banner might be displayed at 360–430px wide. On a desktop, that same banner could be 1200–1920px wide. If you always serve the desktop size, mobile users download 3–10× more bytes than necessary.
What is image transformation in digital processing?
Image transformation is when you take an image, or multiple images, and mathematically change the pixel data to create a new image or new representation that’s easier to analyze or use for computers.

You might transform one image, like sharpening it or changing contrast. Or you might transform multiple images together, especially in multispectral work, where you have several bands of the same scene, sometimes captured at different times.
Consider the hero banner again. Image transformation takes one master banner image and produces the right version for each screen, layout, and browser without manually designing every file.
Why ECS Fargate?
AWS ECS Fargate was the ideal choice for this workload:
- Serverless Infrastructure: No provisioning or scaling clusters. AWS handles server management, resource allocation, and scaling automatically.
- Workload Isolation: Each task runs in its own isolated environment. No shared kernel, CPU, memory, or network interface with other tasks.
- Flexible Resources: Specify exact CPU and memory requirements. Fargate provisions precisely what’s needed.
- ARM64 + Graviton: Up to 40% better price/performance compared to x86. Sharp runs beautifully on ARM64.
- Auto Scaling: Scales seamlessly with traffic spikes. No paying for idle resources.
- Pay-as-you-go: Only pay for compute resources actually used. Fargate Spot adds additional savings.
Architecture Overview
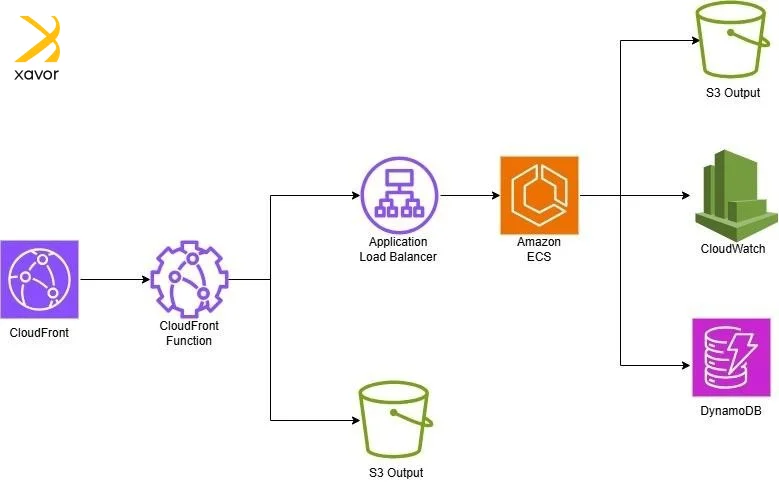
Flow: CloudFront receives request → CloudFront Function normalizes path → Origin Group checks S3 first → On cache miss, ALB routes to ECS Fargate → Sharp processes image → Stored in S3 → Cached for future requests.
The architecture follows a “cache-first, process-on-miss” pattern with these key components:
- CloudFront Distribution: Entry point for all image requests
- CloudFront Functions: Path normalization and rewriting
- S3 (Primary Origin): Stores transformed images
- ALB (Fallback Origin): Routes to ECS on cache miss
- ECS Fargate: Sharp-based image processing
- DynamoDB + CloudWatch: Tracking and monitoring
Request Flow Deep Dive
CloudFront Functions
Handles path normalization. A request like /images/guitar-123.jpg?w=500&q=80&fmt=webp becomes /productweb/guitar-123/w500_q80.webp. This normalized path is our cache key.

Origin Groups
Two origins configured:
- Primary: S3 bucket with transformed images
- Failover: ALB pointing to ECS cluster
When S3 returns 404, CloudFront automatically fails over to ALB. Native AWS functionality, no custom logic needed.
Image Processing
Each ECS task runs Node.js with Sharp. The container fetches source images from S3, applies transformations (resize, format conversion, quality adjustment), stores the result back to S3, and returns the processed image.
Infrastructure as Code
The entire stack is managed with Terraform modules. ECS cluster configuration includes service definitions with CPU (1024), memory (2048), and desired count (3) specifications.
Container setup uses a Node.js Alpine image with Sharp installed for ARM64 architecture, optimized for Graviton processors.
Performance Optimization
We reduced P99 latency from 1.5s to under 500ms through:
- Container prewarming: Minimum 3 tasks always running
- Connection pooling: Reusing S3/DynamoDB connections
- Parallel operations: Fetch source image and config simultaneously
- Sharp streaming: For large images
Cache hit rate: 95%+ achieved through intelligent cache key design, 30-day TTLs, and prewarming popular images.
Results
| Metric | Before | After | Improvement |
| P99 Latency (cache miss) | 1.5s | 450ms | 70% faster |
| P99 Latency (cache hit) | 80ms | 25ms | 69% faster |
| Cache Hit Rate | 78% | 96% | +18 points |
Cost savings from Fargate’s pay-as-you-go model, Fargate Spot for batch operations, intelligent caching, and Graviton processors helped us create a highly optimized solution.
- Fargate simplifies everything: Focus on application logic, not infrastructure.
- Origin Groups are powerful: Native CloudFront failover eliminates custom logic.
- Normalize aggressively: Cache key normalization is the biggest factor in hit rates.
- ARM64 is ready: Graviton + Sharp delivers excellent price/performance.
The combination of ECS Fargate, CloudFront, and Sharp gave us performance, flexibility, and cost efficiency, all while being infrastructure as code, reproducible, and maintainable.
Tags: AWS, ECS, CloudFront, Image Processing, Sharp, DevOps, Terraform
Types of image transformation
Digital images are described using the (x,y) coordinates. Each pixel has a position on the (x.y) graph and a value, such as brightness or color. New images are created by either:
- Moving pixel positions on the coordinate map
- Changing how we represent the image data
1. Fourier transformation
The Fourier Transform (FT) is a way to “re-describe” an image. Instead of representing an image as pixel brightness at each (x, y) location, FT represents it as a mix of frequencies. Think of frequencies as how quickly pixel values change across the image.
- Low-frequency components are smooth, slowly changing areas, such as a plain background or soft lighting
- High-frequency components are fast changes, like edges, fine texture, hair, text
Imagine you take a photo under certain LED lights, and you get faint horizontal stripes across the whole image. In the pixel view, those stripes are spread everywhere, so it’s hard to remove them without blurring the whole image.
When you apply the Fourier Transform, it turns an image into a view of its repeating patterns.
Regular stripes are a repeating pattern, so in the frequency view, they appear as a few bright spikes. You can simply reduce those spikes with a filter instead of touching every pixel.
Then you convert back, and the stripes fade away while most real details stay intact.
That is why FT is widely used for filtering, detail emphasis, feature analysis, and some edge detection workflows.
2. Discrete cosine transformation (DCT)
DCT is a way to rewrite an image block into a set of numbers called coefficients. The key idea is that in most images, a small number of coefficients capture most of the visible content. The rest mainly represent tiny details that humans often don’t notice much.
So, for compression, we can keep the important coefficients and reduce or drop many of the small ones. That makes the file much smaller, with only a small and often acceptable loss of quality. This is why DCT is widely used in lossy compression, like JPEG.
Important steps in the image transformation process
1. Acquiring the image
This is the starting point. The image is captured or fetched from a source, suchas:
- A camera
- Scanner
- Storage system
It is then converted into a digital form that the system can work with. People sometimes include basic prep here, which is why it’s also called preprocessing.
2. Enhancing the image
Next step improves how the image looks, so key details stand out. This doesn’t fix the image scientifically; rather, it makes it clearer for humans or algorithms by adjusting things like brightness, contrast, sharpness, and noise.
3. Restoration of the image
Restoration is more technical than enhancement. The goal is to recover a cleaner version of the original scene when the image has been degraded. It uses mathematical and sometimes probabilistic models to estimate what the image should have looked like.
4. Color processing the image
Now you need to handle color properly by using color models, like RGB, HSV, or YCbCr, depending on the task. This matters a lot today because most images online are color, and some operations work better or more consistently in certain color spaces.
Conclusion
We all love nice visuals and graphics in our tech solutions. But images are usually the biggest contributor to slow performance. If images aren’t optimized, speed drops, users get annoyed, and leave quickly.
Image transformation is necessary to serve the best image version for each situation. It brings the right format, right size for the right screen, and the right quality for the user’s device and connection. And to do that well, we used AWS ECS and CloudFront in this example. This combination of AWS services and other technologies was a quick, scalable, and budget-friendly way of serving huge volumes of images that we encounter at Xavor.
Try out this solution in your own digital image processing projects. Contact us at [email protected] to get in touch with our experts for more improvised solutions like these.

FAQs
Image processing is the use of software to analyze, enhance, or transform digital images by working with their pixel data. It’s commonly used to resize, compress, adjust quality, change formats (JPEG/WebP/AVIF), and optimize images for faster loading and better visual output.
Four common image processing methods are 1) enhancement, which improves clarity and contrast. 2) Restoration fixes degradation like blur or noise. 3) Transformation resizes, crops, rotates, or formats conversion. 4) And compression reduces file size with lossless or lossy techniques for faster delivery.
Image processing is commonly done using tools and libraries such as OpenCV, Sharp, ImageMagick, Adobe Photoshop, and GIMP. In modern web and cloud applications, libraries like Sharp combined with cloud services are widely used for fast, scalable image processing.