
Face recognition in mobile applications is fast becoming a standard practice for greater security and authentication. It is one of the many elating features that businesses are incorporating into their digital products to enhance user experience.
Through this article, we will focus on the creation of a robust face detection application using React Native and FaceNet for unparalleled efficiency and accuracy. React Native face detection capabilties have significantly increased after the introduction of FaceNet, which is Google’s facial recognition system based on deep learning models.
Moreover, the article will also address challenges of integrating sophisticated machine learning functionalities like FaceNet into the React Native framework. Confronting the complexities arising from Facenet’s intricate nature and demanding computational requirements.
The piece navigates these obstacles with finesse through the strategic implementation of native bridging. Combining native Android app development services and its capabilities with the adaptability of React Native can strike a balance between innovation and practicality.
How does face detection work?
Face detection identities human faces in images and videos to distinguish them from other objects. For example, a face detection attendance system in an office can use a face detection camera to keep record of employees that have reported for work each day.
A face detection model uses AI and machine learning algorithms, statistical analysis, and image processing to identify human faces and demarcate their boundaries. But before looking for faces, the system often cleans up the image like removing backgroudn clutter so it’s easier for the face detection algorithm.
Next, a face detection app would look for landmarks. Face landmarks are notable features of the human face, such as:
- Eyes
- Nose
- Eyebrows
- Mouth
Why Facenet
Google FaceNet is very distinctive as it stands out in face-related tasks such as recognition, identity verification, and grouping similar faces. Its uniqueness lies in its approach to these tasks. FaceNet generates “embeddings” – numerical signatures that encapsulate a face’s characteristics, rather than inventing new recognition or verification methods.
These embeddings together with established techniques act like k-Nearest Neighbors for recognition or clustering algorithms for grouping. FaceNet’s core strength is in creating these embeddings, that use a deep complex neural network trained to link embeddings’ distances with facial similarities. These are then optimized through specific image preparations.
The Need for Bridging
Developers use React Native for cross-platform app development but still this platform has its limitations and challenges. It struggles with computationally intensive or hardware-intensive tasks like real-time face detection. Facenet requires more processing power and deeper hardware access than what a standard React Native setup provides.
The purpose and actual motive behind bridging is to address this issue by enabling coding in native languages (Swift for iOS, Kotlin for Android) and integrating these with the React Native codebase. This method fully utilizes Facenet’s capabilities on iOS and Android within a React Native application.
Overview of the Application
The application demonstrates the effective integration of Facenet’s robust face detection in a cross-platform React Native app. It shows how Facenet can be utilized within native Android and iOS environments and bridged to React Native. This integration offers a responsive user experience.
The app combines Facenet’s accurate and fast face detection with React Native’s user-friendly interface and cross-platform efficiency.
React Native face detection using FaceNet: Technical Implementation
1. React Native
Initiating Face Detection
The face detection in our app starts when a user clicks ‘Scan Face‘. This triggers operations that integrate React Native’s functionality with native modules.
React Native Vision Camera
‘Scan Face‘ activates the React Native Vision Camera, a library efficient for real-time photo and video capture in React Native apps. It’s crucial for obtaining high-quality images for accurate face detection.
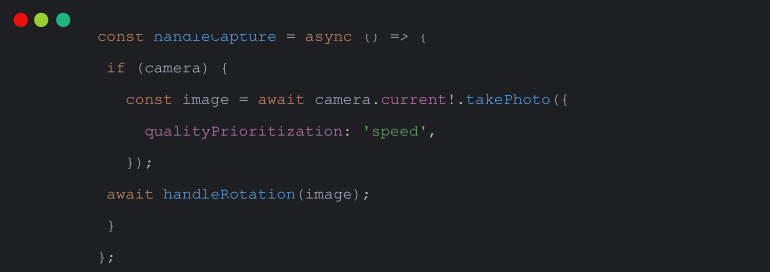
Image Processing: Resizing and Orientation
After capture, the app processes the image for optimal detection. This includes resizing and adjusting orientation. The handleRotation function, as shown below, plays a key role in this process:
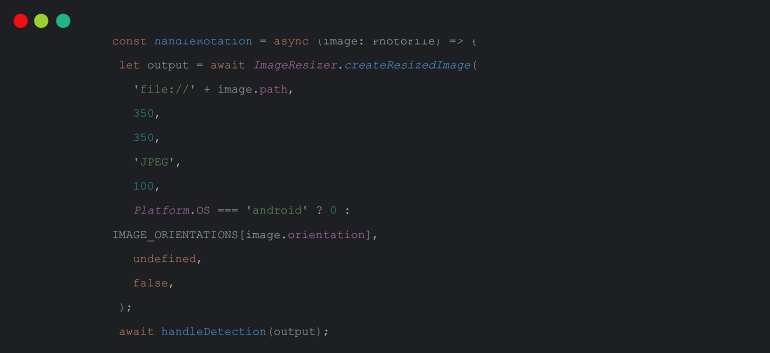
Here, ImageResizer.reateResizedImage is used for resizing to the needed dimensions and for correcting orientation. This happens after considering differences in iOS and Android image handling.
Detecting Face in Image
With the image processed, the next crucial step is to detect faces within it. The handleDetection function is central to this process:

Here, the FaceDetection.detect function from the @react-native-ml-kit/face-detection library is used to identify faces in the image, capturing all relevant landmarks and contours. If a face is detected, the app proceeds to crop the image around the detected face and proceeds with recognition processes. Otherwise, it informs the users and sends alerts or notification for no face detection.
Crop Image
After detecting a face in the image, the handleFaceCrop function is called. This function calculates the precise region of the detected face in the original image and uses the react-native-photo-manipulator library to crop the face.
The resulting cropped image is then utilized in subsequent processes.
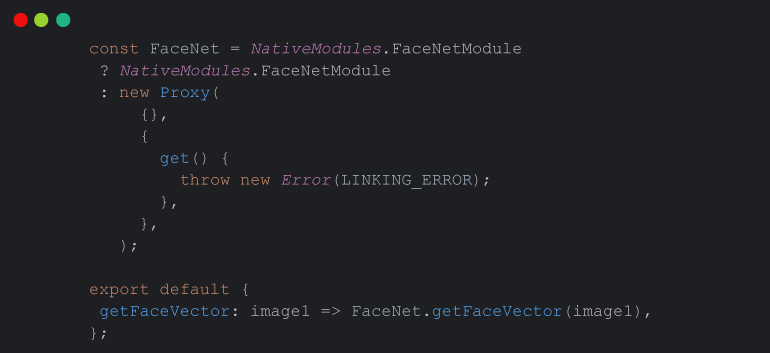
Face Vector Extraction
The FaceNet module interfaces with the native FaceNet implementation to retrieve face vectors. This cross-platform approach allows the app to work seamlessly on both Android and iOS devices.
In the onEmbeddings function, the face vector is obtained from the cropped face image, and platform-specific handling is applied if necessary. Once you get hold of the face vector, it is ready for additional processing.
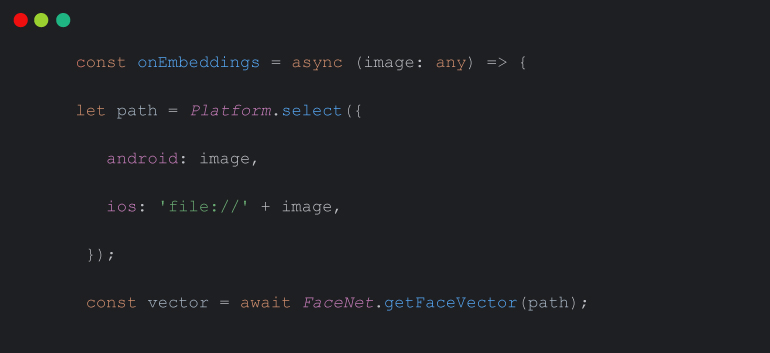
After getting face vector, we will receive a JSON object, in json object we have a JSON array data.We will split the array and convert it in numeric array. Then we will pass the numeric list to onComparison function to compare the extracted vector.


Compare Vectors
Here’s a step-by-step breakdown of the comparison process:
- Inputs: Takes two face vectors (x1 and x2) and a mode (‘L2norm‘ or ‘cosine‘) for comparison.
- Initialization: Sets up variables for the score, thresholds for cosine and L2 norm, and a match indicator.
- Calculation:
- Cosine Similarity: If mode is ‘cosine‘, calculate similarity score. A higher score implies a better match. It compares the score with the cosine threshold to determine if there’s a match.
- L2 Norm: If mode is ‘L2norm‘, calculate L2 norm percentage. A lower score indicates a better match. It compares the score with the L2 threshold to decide on a match.
- Output: Returns an object with the rounded score and a boolean indicating a match or not.

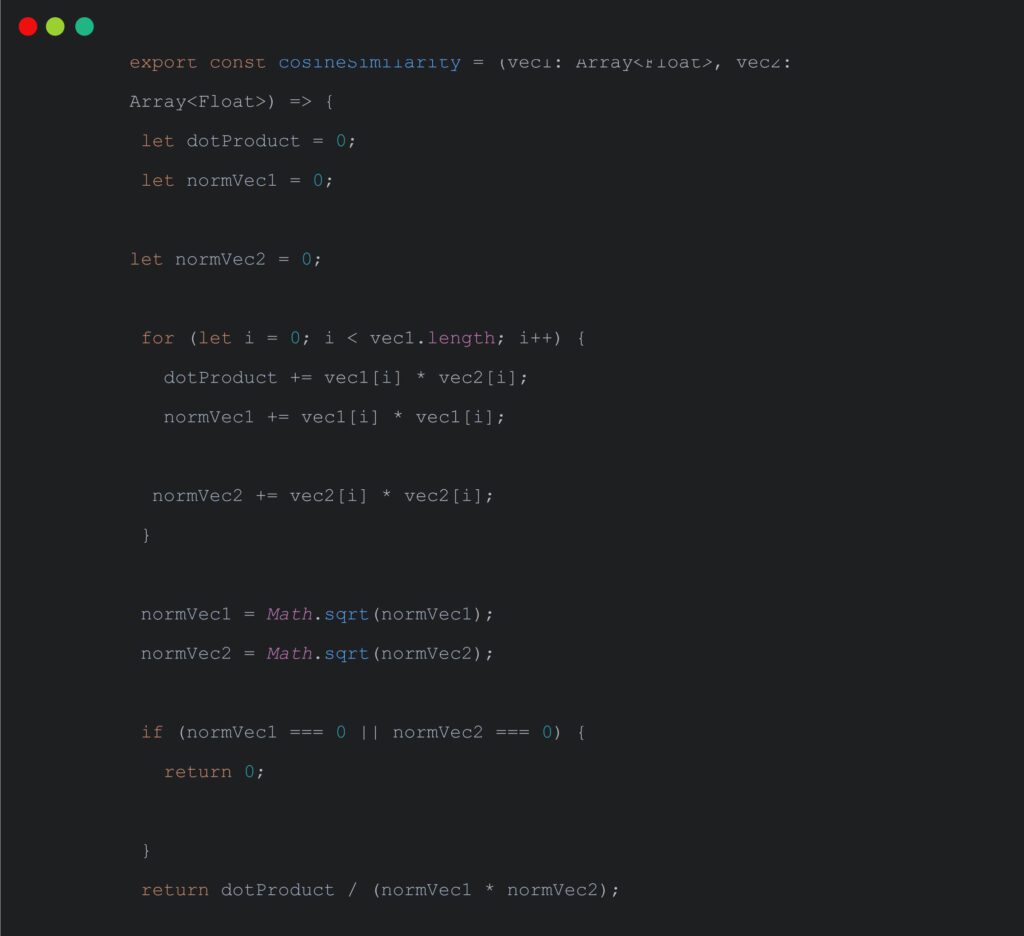
Cosine Similarity
- This function calculates the cosine similarity between two vectors vec1 and vec2.
- It computes the dot product of the vectors and the norms of each vector.
- If either of the vector norms is zero (to avoid division by zero), it returns 0.
- Otherwise, it returns the cosine similarity score.
l2NormPercentage
- This function calculates the L2 norm percentage between two vectors vec1 and vec2.
- It computes the sum of squared differences between corresponding elements of the vectors.
- The result is the square root of the sum, which represents the L2 norm percentage.

The combination of these functions gives way to both cosine similarity and L2 norm-based comparisons between face vectors. It then tends to provide flexibility in determining whether two vectors represent the same person.
2. Android Native
In this scenario, we implement a facenet model in android native to extract the face vector. We are calling getFaceVector in react native and by using bridging we will call this method in android native.
Here is implementation of bridging in android native.
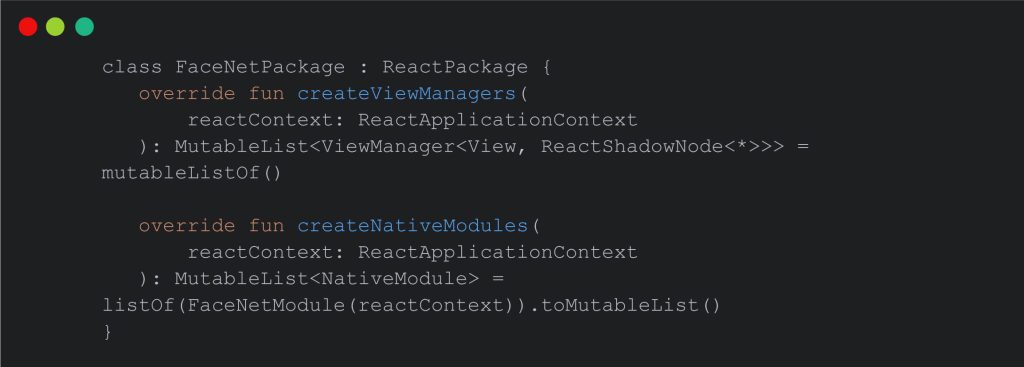
It’s a bridge between our Android native code and our React Native JavaScript code. It allows users to register and expose native modules (such as FaceNetModule) to be used in our React Native application.
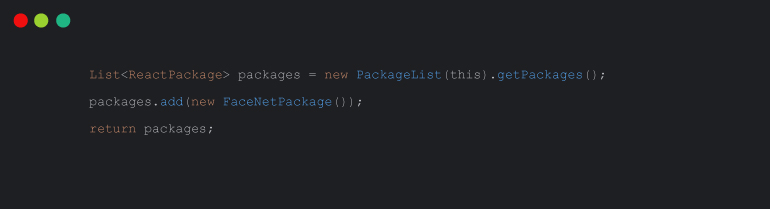
We will register our class in MainApplication.java
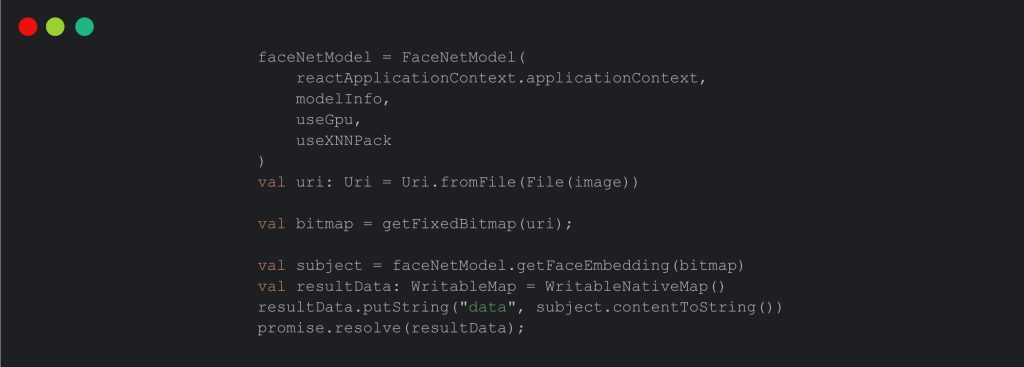
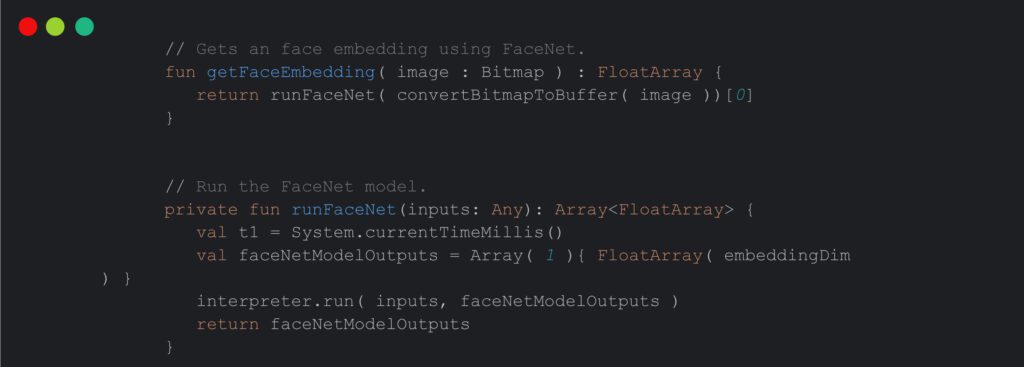
3. Fetch Face Vector in Android
We will initialize the FaceNetModel, which is responsible for face recognition. It sets the model information, GPU usage, and XNNPack usage. This initialization ensures that the face recognition model is ready for use.
This is the implementation of our code:
FaceNetModel contains all configurations and processing methods. We are using tensorflow lite facenet. FaceNet in simple words could be described as a deep and intricate, neural network that helps to extract features person’s face image. This technology surfaced in 2015 with the hard work of Google researchers Schroff et al.
FaceNet captures the picture of a face and treats it as input. It then outputs or generates a vector of 128 numbers. These numbers or vectors show the most important or prominent features of a face. In machine learning terminology, we call it embedding.
Here is the implementation of fetching face vectors.
4. IOS Native
Now we will start implementing a facenet model in iOS native to extract the face vector, we are calling getFaceVector in react native and by using bridging we will call this method in iOS native.
Here is implementation of bridging in iOS native.
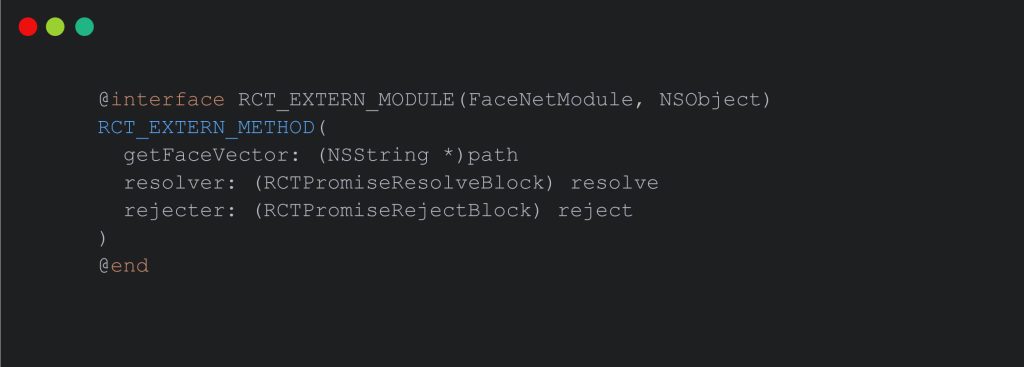
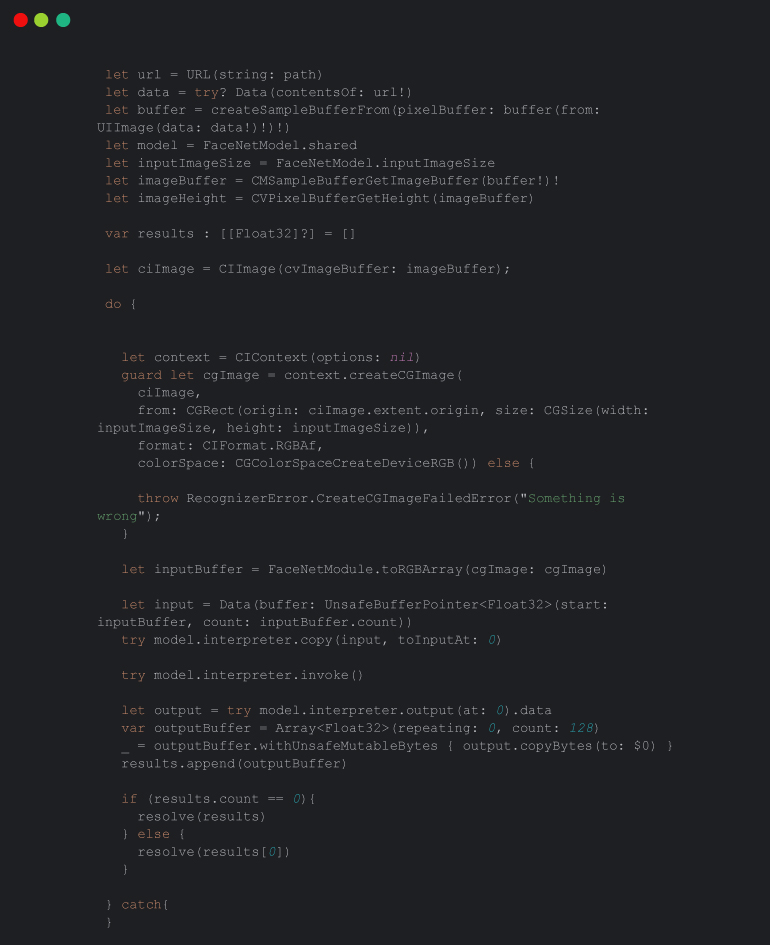
Fetch Face Vector in IOS
In iOS, we created the “FaceNetModule” in Objective-C. We exposed the “getFaceVector” method to process images for face recognition.
This is implementation of get faceVector in iOS
Why embeddings
Embeddings are fundamental to the process as they condense all vital information from an image into a compact vector. FaceNet, specifically, compresses a face into a 128-number vector. The idea is that embeddings of similar faces will be alike.
In machine learning solutions, transforming high-dimensional data (like images) into low-dimensional representations (embeddings) is common. Since embeddings are vectors, they can be interpreted as points in a Cartesian coordinate system, that allow users to plot an image of a face in this system using its embeddings.
Results and Performance
Our application demonstrates high accuracy in face detection, a testament to FaceNet’s robust algorithm.
Accuracy is crucial in many applications, and achieving it is a noteworthy accomplishment. Additionally, the application’s speed and efficiency in face detection are impressive, which makes it practical for real-world applications where prompt responses are essential.
Challenges and Learnings
Integrating FaceNet into React Native posed unique challenges, especially in bridging native modules and ensuring smooth interaction between JavaScript and native code. This process offered deep insights into React Native’s workings and the intricacies of integrating advanced machine learning models like FaceNet.
Overcoming these challenges required a profound understanding of both React Native and FaceNet, contributing to a significant learning experience.
Conclusion
In the end, it is evident how React Native’s capacity for developing sophisticated applications paves the way for future possibilities. It occurs so with the successful integration of FaceNet for face detection. The possibilities are:
- Real-time Face Recognition: Building upon the established face detection foundation, you could venture into real-time face recognition. It opens doors to various applications like device unlocking or personalized UX.
- Augmented Reality (AR) Features: Face detection and recognition are key components of many AR applications. We could explore incorporating AR features into your application that allow users to interact with virtual objects based on their facial expressions and movements.
- Improved User Experience: Utilizing FaceNet could further enhance the user experience by offering personalized content, recommendations, or security features, like tailoring content based on recognized faces in photos or videos.
If you are elated by this technology and want to learn more, you must contact Xavor for exciting and intriguing services and information.