Kubernetes persistent volume is an excellent framework for providing data storage options for specific stateful applications. They separate the implementation of a storage system from the way your pods use it. Best cloud services vendors must keep the data locally, on a network share, or in a block storage volume in a persistent volume.
To speak in simpler terms, Kubernetes persistent volume or Kubernetes persistent volumes is a request for storage that a user makes. Kubernetes persistent storage is meant for the use of certain application types.
When we talk about Kubernetes persistent volume, we mean that persistent volumes take care of the difficulties associated with storing persistent data, such as databases and logs in Kubernetes. In Kubernetes persistent volume, Pod-running containers have stateless, temporary filesystems. For Kubernetes persistent volume, Although the files in your applications’ containers are readable and writable. So be ready for the loss of any changes if the pod restarts or terminates.
In this article, you will learn about persistent volumes, their significance, and how to use them in your cluster. We will highlight the role of Kubernetes persistent volume and Kubernetes persistent storage for our esteemed readers. Additionally, you’ll see some typical administration commands for utilizing Kubectl to communicate with persistent volumes and Kubernetes persistent storage or persistent storage Kubernetes.
Why Persistent Volume?
Without a particular configuration, you cannot start up a database server in a Kubernetes pod because of the transient nature of container filesystems. This stems from the need for Kubernetes volumes and Kubernetes persistent storage solution. If it’s not for Kubernetes persistent volumes, If not, you will lose your data immediately after the pod reboots. Additionally, because all the files are in a single container, you wouldn’t be able to scale the database deployment. Kubernetes persistence database helps developers in this regard.
You can resolve this problem with persistent volumes or Kubernetes volumes. They are constructed on top of the more basic volume system, offering a shared storage space accessible to all pod containers. Such a solution is rendered by Kubernetes persistent volume. Kubernetes can restore volumes even after the crash and restart of a single container. Which system other Kubernetes persistent volume offers such impeccable and effective Kubernetes volume?
Also, a higher abstraction known as persistent volumes separates storage from the pods that consume it. Furthermore, a persistent volume is shareable by several pods and has its lifespan and Kubernetes persistent volume stores data at the cluster or namespace level.
In Kubernetes persistent volume, pods employ persistent volumes, but they never truly belong to them. Even after all pods that reference it have been removed, the volume and its contents will still be accessible in the cluster, allowing it to be reattached to new, upcoming pods. Such is the marvel of Kubernetes persistent volume.
When To Use Persistent Volumes?
It would help if you utilized persistent volumes with Kubernetes anytime you have data that needs to survive individual pods. It’s typically desirable to store data in a persistent volume unless Kubernetes volume is it’s transient or unique to a particular container.
Here are some everyday use cases of Kubernetes Persistent Volume:
- Database: Data in a database should always be present on a persistent volume so that it can survive the server’s container lifecycle. Do not delete the user’s data every time the pod restarts.
- Logs availability: Writing container log files to a persistent volume ensures they’ll be available after a crash or termination. If they weren’t written to a persistent drive, the collision will erase the logs that would have assisted you in troubleshooting the problem.
- Protection of data: You can prevent unintentional data erasure with persistent volumes. Kubernetes persistent volume contains safeguards that prohibit taking away volumes that are being used by pods right now.
- Independent data: Persistent volumes make sense when your data is crucial to your cluster. You can manage backups, performance, and storage capacity allocations more easily with their help because they give you the capability to manage data independently of application containers.
Creating a Persistent Volume
There are two ways of creating persistent volumes. You can make Kubernetes persistent volume statically and dynamically as well. When you add the volume manually to a cluster, it gives birth to a statically created volume. A dynamically constructed volume is designed as a result when a volume that doesn’t exist is referenced. You’ll learn how to use Kubectl to create a volume with the help of a static method. We will also discuss Kubernetes yaml pvc pv example.
For that purpose, in Kubernetes persistent volume in the beginning, you will need a YAML file specifically for the persistent volume:
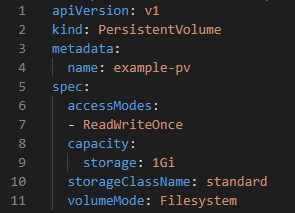
This file is defined as a straightforward persistent volume with a 1Gi capacity. A few other configuration settings define the volume’s provisioning and access.
Access Modes
The accessModes in Kubernetes persistent volume field describes which nodes and pods can access the volume:
- ReadWriteOnce implies that all the pods present in a single mode are capable of reading and writing data.
- ReadOnlyMany and ReadWriteMany apply to the pods on multiple nodes that can read-only and read-write access both.
- ReadWriteOncePod is a new mode introduced in Kubernetes v1.22 that allows read-write access by a single pod on a single node.
Volume Mode
A volumeMode of Filesystem in persistent storage Kubernetes is a preselected and default option that usually comes with the desired behavior. This indicates that the volume will be mounted into each pod’s filesystem as a directory. The volume is shown as a raw block storage device without a pre-configured filesystem when the Block is set to its alternative value. This could be best understood with Kubernetes persistent volumes example.
Storage Classes
The storageClassName is an integral aspect of the configuration of persistent volume in Kubernetes persistent volume.. The hosting environment for your cluster determines the storage classes you can use. If you are using Google Kubernetes Engine (GKE) to run your cluster, the standard class displayed here is accessible.
For clusters running Microsoft Azure Kubernetes Service AKS, you can use azurefile-csi or do-block-storage with Digital Ocean Managed Kubernetes. Many providers also offer object storage options that integrate seamlessly with Kubernetes persistent volumes. When you supply your installation, you can create a storage class that uses your Kubernetes PV local discs if you manage your cluster.
When you establish your persistent volume, an error will be generated if you attempt to utilize a storage class that is not supported by your environment,
Adding Your Volume to Your Cluster
In Kubernetes PV this is how you add volume to the cluster. Use Kubectl option for adding the new persistent volume to a cluster:
>_$ kubectl apply -f pv.yaml
When running this command, you might see the following error message:
The PersistentVolume “example-pv” is invalid: spec:
Required value: must specify a volume type
This typically happens when the underlying storage class creates your storage using a provisioner. The cloud provider is not allocating storage that is not actively used in your cluster. In this case, you want to employ dynamic volume creation to construct a persistent volume with Kubernetes whenever required instantly. The subsequent section goes over this.
Linking Persistent Volumes to Pods
A persistent volume claim connects persistent volumes to pods. A claim is a request from a pod to read and write files from a specific volume. This is the general Kubernetes persistent volume claim below.
Persistent volume claims are stand-alone objects. Below is an example of an old volume:
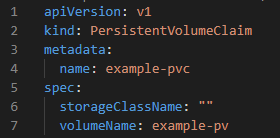
The volumeName field implies an older version of persistent volume. The pod will have access to the example-pv volume when you link this claim to a pod. The storageClassName field is empty, so use the persistent volume’s definition’s storage class in the claim instead.
Instead of referencing previous volumes, persistent volume claims may implicitly construct new ones. You should include information about the volume in the claim’s specification. The above-mentioned dynamic volume production technique is:
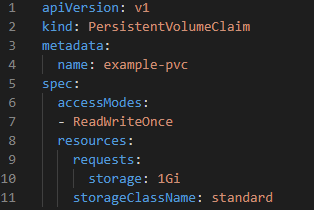
The storageClassName and accessModes fields in the claim were added to allow for volume configuration. The resources.requests.storage parameter specifies the volume’s storage capacity. Please be aware that this format differs slightly from that of a standalone persistent volume.
You can also apply the same claim for the cluster with the help of kubectl:
>_$ kubectl apply -f pvc.yaml
persistentvolumeclaim/example-pvc created
Even if the stand-alone volume creation failed with an error, the claim creation should succeed, assuming that you specified a storage class that is accessible in your cluster. The storage class dynamically provisions for new persistent volumes with Kubernetes that will meet the claim.
Finally, you can link the claim to your pods using the volumes and volumeMount fields in the pod manifest:

Then add the pod to your cluster:
>_$ kubectl apply -f pvc-pod.yaml
pod/pod-with-pvc created
Additionally, the pod’s spec. Volumes field refers to the persistent volume claim. This, however, creates a pod volume with the name pv that can be added to the manifest’s containers section and is mounted to /pv-mount.
Demonstrating Persistence
To verify this behavior and form, we will use the following example.
For an already created pod, fetch a shell:
>_$ kubectl exec –stdin –tty pod-with-pvc — sh
Now start by writing a file to the /pv-mount directory, which was for mounting the persistent volume:
>_$ echo “This file is persisted” > /pv-mount/demo
Then detach from the container:
>_$ exit
Use kubectl to delete the pod:
>_$ kubectl delete pods/pod-with-pvc
pod “pod-with-pvc” deleted
Reconstruct the pod using the YAML manifest again:
>_$ kubectl apply -f pvc-pod.yaml
pod/pod-with-pvc created
Introduce a shell in the new pod of a container and then try to read the file from /pv-mount/demo:
>_$ kubectl exec –stdin –tty pod-with-pvc — sh
$ cat /pv-mount/demo
This file persisted.
Also, the deletion of the first pod had no impact on the persistent volume’s content. Therefore, everything that has already been written is kept anytime it is installed into fresh pods.
Managing Persistent Volumes
Kubectl allows you to retrieve a list of all the persistent volumes:

Similarly, you can view all your persistent volume claims:

It usually means that the storage class is still supplying storage for the volume if a volume or claim has Pending status. Using the describe command to inspect the object’s event history will allow you to determine what’s delaying the operation:

For editing the volumes along with claims, the best way to move forward is by modifying the YAML file and then reapplying it to the cluster with the help of kubectl:
>_$ kubectl apply -f changed-file.yaml
This automatically recognizes and applies the modifications you make using the declarative API model of Kubernetes. Run the edit command to launch your editor and open the object’s YAML if you use imperative commands instead. When you save and close the document, changes will apply consequently:
>_$ kubectl edit pvc example-pvc
Volume attributes such as access mode and storage class are also unchangeable. Whereas other fields, like the volume’s capacity, rely on the implementation, while most significant storage types support dynamic resizing, not all do. If unsure, go to the documentation provided by your Kubernetes provider.
Also, manually adding a persistent volume claim does not change dynamically produced persistent volume objects. Edit the claim’s properties instead.
But, with the help of the delete command, you can remove the volume along with a claim:

So, by doing this, you clear out and remove the provider’s supplied storage. Unless you perform separate backups, the data contained in the volume will not be recoverable. Hence, avoid deleting volumes that were dynamically provided by a storage class. Moreover, the storage class will handle the persistent volume object for you.
Persistent Volumes Best Practices
- Always Specify Storage Class: Define a storage class for Persistent Volumes to avoid issues with default settings.
- Plan for Future Storage: Provision enough storage upfront because often resizing can be challenging based on the storage driver.
- Prefer Dynamic Provisioning: Opt for dynamic over static PV provisioning for convenience, simplicity, and flexibility.
- Choose Reclaim Policy Carefully: Select the right reclaim policy; consider ‘Retain’ for critical data.
- Secure with RBAC: Use RBAC to protect PVs and PVCs from accidental changes that potentially can reduce the risk of data loss.
Conclusion
Using persistent volumes, you can also store data independently on the pods in your Kubernetes cluster. Moreover, storage classes that interact with the various local disc, cloud storage, and network share types support them. Similarly, the way that pods access and use the volume is always separate from these implementation specifics.
We also discussed in this article the use cases for persistent volumes with Kubernetes, how they differ from standard volumes, and the procedures for adding and utilizing persistent volumes and persistent volume claims within your Kubernetes cluster. Additionally, you saw a few Kubectl utility commands that can communicate with your volumes. With them, you may deploy stateful applications in Kubernetes without worrying about potential data loss due to container restarts.
If you need any assistance with Azure Kubernetes Service (AKS), contact us at [email protected].
FAQs