
A new family of JavaScript frameworks based on the ModelViewController (MVC) architecture has emerged over the years, like Angular, Backbone.js, and Ember.js. However, Angular is the most popular framework among developers. It enables developers to create dynamic, efficient, and scalable applications. With each new release, Angular introduces features that enhance its capabilities and streamline development process.
One such edition is the inject() function that was first introduced in Angular 14 and refined in the successive Angular versions. The inject() function represents a paradigm shift in how developers approach dependency injection. Unlike traditional constructor-based injection, the inject() function offers a more flexible and declarative approach, enabling developers to inject dependencies directly within functions and other contexts where constructor injection might not be feasible.
As Angular continues to advance, understanding and leveraging the inject() function becomes crucial for developers looking to stay at the forefront of modern web development practices.
This article delves into the nuances of the inject() function in Angular 14, 15, and 16, exploring its features, benefits, and practical applications in real-world scenarios.

This article discusses the angular inject function feature in Angular 14, 15, and 16, the latest version of Angular.
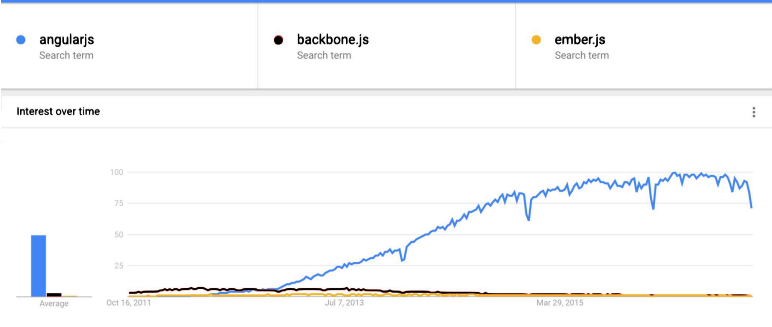
Angular, developed and maintained by Google, is used by a lot of well-known websites. Examples include http:// weather.com, http:// forbes.com, and http:// intel.com. That is why Angular is continuously being improved, and new releases and features have been released throughout the preceding decade.
Currently, the Angular 16 front-end framework is the latest release; it was launched on May 3, 2023. From typed forms and standalone components to new primitives in the Angular CDK (Component Dev Kit), many new features are introduced in Angular 15/16.
However, we will only be discussing the inject feature in Angular 14, 15, and 16.
A quick word on dependency injection (DI)
Dependency injection is the way how Angular gives a class in the code the things it needs instead of the class creating those things itself. Most classes depend on other objects to do their job, like a component depending on a UserService to load users.
Without DI, if a component needs data, it will:
- Create the service
- Decide which version of the service to use
- Manage how many copies get created
But with DI, it can skip all of that because Angular does everything hands it to the component, usually through the constructor.
What is Inject() Function in Angular 14, 15 and 16
The inject () function simplifies dependency retrieval by taking an InjectionToken and providing the corresponding value from the active injector, offering an alternative to constructor injection for obtaining dependencies.
As you might already know, in Angular 14 and 15 and its previous versions, we preferred to inject a dependency in the constructor of providers (components, pipes or services, etc.) instead of using inject(). The reason was that its features and uses were limited.
However, Inject Angular 16 has made many changes and upgrades to inject(). An Angular injection function is a synchronous function that injects services directly or indirectly employing the inject () function. Using Angular’s inject() function, we can get a reference to a token from the injector that is active. This new feature, therefore, allows us to inject the providers without using the constructor class.
This opens up a whole set of new options and possibilities since it enables us to create reusable functions.
Here is a simple example of using the inject function:
import { Component, inject } from ‘@angular/core’;
import { HttpClient} from ‘@angular/common/http’;
function getHostUrl(hostUrl: string) {
return inject(HttpClient).get(hostUrl);
}
@Component({
…
standalone: true
})
export class foo(){
data = getHostUrl(‘url’);
}
Inject() parameters
The inject function includes a token that represents the dependency that should be injected and injection flags as parameters.

Injection Flags
Injection flags can either be InjectOptions or InjectFlags. Both have made injecting dependency in the constructor class easier. We can simply put injection flags true or false instead of using injection strategies like @Optional, @SkipSelf, etc.
For example, if we want the effect of injection strategy @Optional, we will now have to add the injection flag of optional: true, and that’s it!
When Can We Use Angular Inject() Function
As you can see from the above example, using inject() instead of specifying dependency in the constructor using @Inject has more benefits. For instance, the code looks cleaner and more organized.
Other than that, if we use @Inject and Angular signals to inject some particular token, we have to explicitly describe the type of object or the class we will inject. Now, this usage may be error-prone if we make a logical error, like giving the wrong datatype for that object. Typescript won’t be able to detect the error and allow it. On the other hand, inject() can infer the type from the injection token.
Using a traditional procedure makes inheritance somewhat challenging as it requires you to make a lot of changes in every derived class if there is a change in the base class.
However, inject() simplifies inheritance in the Angular inject function() and eradicates this problem. We can see that using the example in app development.
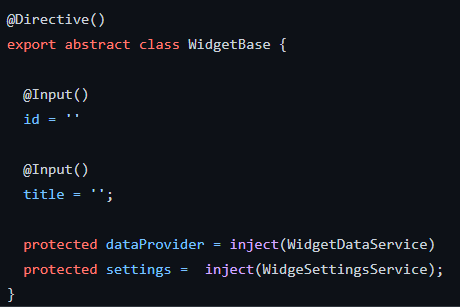
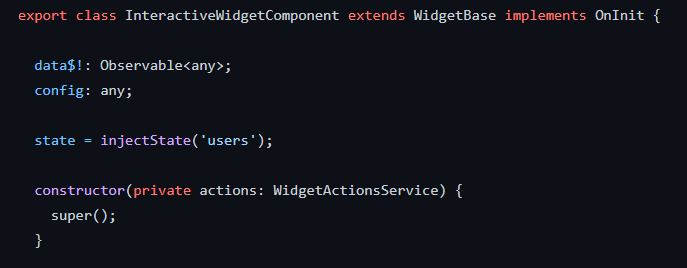
As you can see from the above example, we only have to change the base class, and there is no need to adjust the derived classes.
Where Can We Use Inject() Function
Angular documentation says:
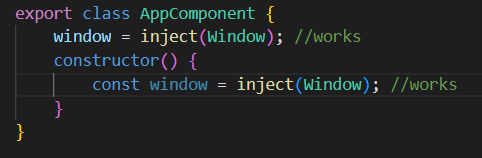
In practice, the inject() calls are allowed in a constructor, a constructor parameter, and a field initializer.
The inject function just works inside the injection context. We can call it when the instance is being created. We are not allowed to use it inside lifecycle hooks or some other methods.
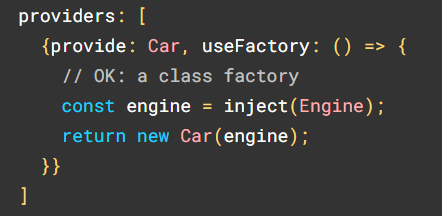
Or, as you can see in the example below from the Angular documentation, we can use it in providers, too. Still, we cannot use the inject() function in lifecycle hooks like ngOnInit() or other classes.
Why Inject () is the Better Choice Than Alternatives
Using inject() instead of alternatives, like constructor injection, mostly comes down to less boilerplate with the same DI rules. It keeps dependency wiring in one consistent style, and often reads cleaner because you don’t have long constructor parameter lists. Moreover, TypeScript usually infers the types, so you write less and still get strong typing.
But the biggest practical win shows up with inheritance. If you have a base service/class that needs common dependencies and lots of child services extend it, constructor-based DI forces every child to repeat those dependencies just to pass them up to the parent. Plumbing that adds noise and is easy to mess up; however, with inject(), the base class can grab the shared dependencies itself, and each child only supplies what’s unique to it, while still being able to use the shared dependencies through the base class.
In large codebases with many inherited classes and many dependencies, switching to inject() can delete a surprising amount of repetitive constructor code.
Conclusion
Continuous professional learning is the rule of thumb in programming. New tools, modules, and frameworks are always appearing, which requires staying ahead of the game as a professional coder. Inject function has made injecting dependency a lot easier, as it allows you to simplify the code and assist you in solving customary problems linked with dependency injection.
Not only that, but it is also a cleaner approach as it avoids a lot of parameters in the constructor. However, inject function angular is still a new approach and will probably be upgraded in the next release.
You can surely use it in your new projects, but we advise you to use it only when necessary.
If you want any further assistance regarding Angular 15/16 or its functions, contact us at [email protected].

FAQs
The inject() function in Angular is used to retrieve dependencies directly inside a function or class body without relying on constructor-based dependency injection. Introduced to support newer patterns like standalone components, it allows developers to access services in places such as guards, resolvers, pipes, or composables.
Using inject instead of a constructor allows for cleaner and more flexible dependency injection, especially in standalone components, functional guards, and utility functions. It reduces boilerplate, makes dependencies easier to access in non-class contexts, and improves code readability in modern Angular patterns.
@Inject is an Angular decorator used to explicitly specify which dependency injection token should be provided to a constructor parameter. It’s mainly used when Angular can’t infer the dependency automatically. In modern Angular, @Inject is less common but still useful in advanced or edge cases involving custom tokens.